
Tiling a bathroom is a key stage of renovation, ensuring not only an aesthetically pleasing finish but also the longevity of the space. Proper installation techniques and adherence to guidelines help avoid common mistakes such as cracking, peeling, or moisture accumulation, which is especially important in rooms with high humidity.
To achieve the best results, we recommend carefully reviewing the workflow, preparing all necessary materials and tools, and, if necessary, ordering renovation and construction services from professionals on https://asapreno.ca/ to ensure a high-quality and reliable finish. By following these guidelines, you will create a comfortable and beautiful space in your bathroom.
Surface Preparation: Selecting Materials and Tools for a High-Quality Finish
Before tiling your bathroom, it is important to properly prepare the surface. A clean, level, and durable base ensures long-lasting and accurate installation. Basic materials for surface preparation include gypsum or cement-based plasters for leveling walls, as well as a special primer that strengthens the substrate and promotes better adhesion of ceramic tiles.
Tools needed for preparatory work should include a level, spatulas, painter’s string, or a laser level to check the surface and corners for evenness. Gloves, brushes, and rollers for applying primer and undercoating are also essential. Proper selection of materials and tools will ensure reliable and accurate tile installation, reduce the risk of damage, and speed up the finishing process.
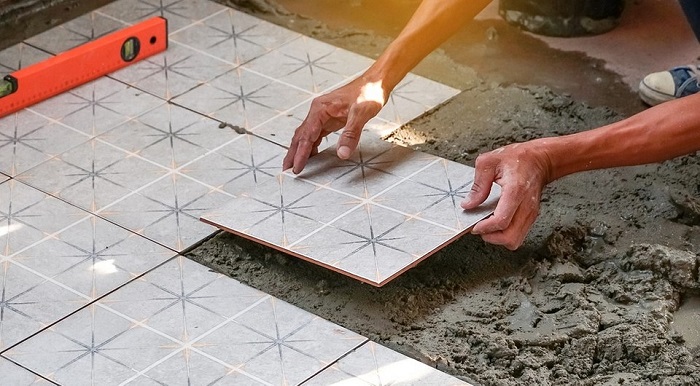
Tiling the Bathroom: Rules and Technology
Before laying tiles, it is important to carefully mark out the space. Proper marking ensures straight lines and a harmonious arrangement of elements on the walls and floor.
For this purpose, use high-quality tools such as levels, plumb lines, and tape measures. It’s especially important to establish starting lines, which serve as a guide for all subsequent work to avoid errors and the need for redoing.
The Subtleties of Marking and Laying Out Tile: Creating Accurate Lines and Optimizing Consumption
Creating accurate lines depends on properly marking the starting lines. Plasterboard or wooden markers are commonly used, which are attached to a level and help maintain a straight line across the entire surface. It’s also important to consider the thickness of the joints to ensure a neat and proportional final surface.
Tiles should be laid out using the “center-to-wall” or “corner-to-corner” principle. This helps achieve symmetry and avoid the need to adjust tiles during the final finishing. It’s also important to calculate the number of tiles in advance to avoid missing or excess materials.
Consumption optimization is achieved through proper layout planning and consideration of tile sizes. For example, by planning a tiling pattern in advance, you can minimize waste and avoid unnecessary expenses. It’s also recommended to use computer programs or templates for more accurate calculations and reduce cutting waste.
Preparing Walls Before Laying: Final Recommendations and Summary
Before laying tiles on bathroom walls, it’s important to thoroughly prepare the surface to achieve a durable and neat finish. Proper cleaning, priming, and leveling are key to ensuring a high-quality result.
Following established guidelines and techniques will ensure reliable adhesion of the tiles to the substrate and prevent potential future problems, such as peeling or cracking.
General Summary and Recommendations
For successful bathroom tiling, we recommend:
- Clean the surface: remove dust, dirt, grease stains, and remnants of old coatings to ensure good adhesive adhesion.
- Prime: use a suitable compound to improve adhesion and strengthen the substrate.
- Level the walls: eliminate unevenness, cracks, and potholes with putty or special mixtures, then sand the surface to achieve a smooth finish.
Carefully following these steps will significantly improve the quality of installation and the longevity of the finish. Remember that surface preparation is the key to the beauty, reliability, and durability of your bathroom.